Thanks for tuning in. I’m Kelly, and I’m one of the Ohio Lumex instrumentation specialists. We’ll be covering the Ohio Lumex recommended maintenance regimen for the M324 Sorbent Trap Analysis System.
Before we jump in, I want to stress proceeding with caution when handling the furnace attachment. Make sure it’s cooled down all the way before performing any maintenance – we recommend waiting roughly 30 minutes to 1 hour. To protect both you and the attachment, proper tools and personal protective equipment should be utilized. Carefully use any tools and cleaning solutions when cooled to maintain the protective coating on the attachment.
We highly recommend keeping up with preventative maintenance of your system as it goes a long way. Not only by reducing troubleshooting efforts down the line but also extending the overall lifetime of your attachment. We’ve broken up the maintenance schedule into procedures recommended for every analysis day, after 20 analysis days, and yearly. We’ll cover daily maintenance procedures first.
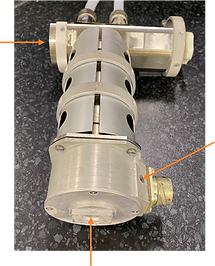
Basic maintenance should be performed on the M324 furnace attachment every analysis day. Sodium carbonate and other debris will settle into attachment. If left uncleaned, the buildup can cause a multitude of issues, including but not limited to, imprecision, poor spike recoveries, and calibration issues. The excess particulate can be gently shaken out from the attachment after each use to slow the accumulation. The arrows point towards the recommended places where a can of compressed air can help remove stubborn soda from the internal nooks and crannies. Fine particulate will coat the inside of the attachment and can be challenging to get rid of with canned air, so a moist KimWipe with deionized water can be used to clean the optical cell area between the windows. Make sure to remove any excess moisture before reassembling the attachment after the daily maintenance routine.
Window inspection and cleaning are also part of the daily maintenance routine. The windows on the furnace attachment are one of the most critical components of the optics. If the windows are dirty or damaged, it can reduce the analyzer’s sensitivity, leading to difficulties calibrating or negatively affecting your measurements. Cleaning the windows with 3% hydrogen peroxide is the most critical step in daily maintenance to ensure minimal interference in the next analyses’ optical path.
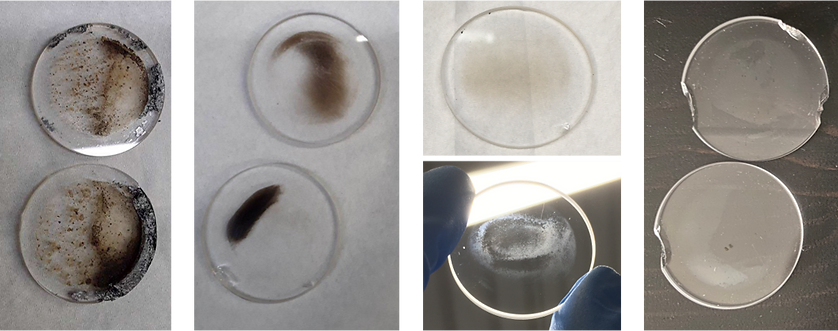
The SD shown on the RAPID software graph is a numeric value that indicates how noisy the baseline is. A noisy baseline reduces your analyzer’s sensitivity and can make it difficult to calibrate and quantify low-level samples. We typically do not recommend moving forward with analysis when the SD is above 3. If the routine cleaning doesn’t bring down the SD below 3, it may be time to replace the windows.
When inspecting the windows, the graphite gaskets should also be inspected to ensure the furnace attachment is airtight. Graphite gaskets prevent leaks, which most commonly occur at the window collars and can result in a spike bias. An indicator of spike bias is the detectable difference between the recovery of liquid spikes and spiked sorbent traps – for example, continuing calibration verifications or CCVs pass within 10%, but spiked traps measure consistently 20% low. To prevent invalidation of any trap results, we created audit spikes to check the analyzer for any spike bias before analyzing sorbent traps. Inspecting graphite gaskets often can help reduce the possibility of leaks or spike bias. If a gasket is dented or cracked, it may be time to replace them.
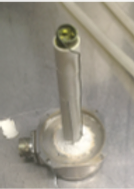
An air mixer is an optional part situated inside the furnace attachment and typically aids in analyzing high-level mercury sorbent traps. It helps increase the residence time of hg inside the attachment and maintain linearity up to the highest calibration point. Like the rest of the attachment, the air mixer can be coated in sodium carbonate and debris, as seen in the picture on the right, causing imprecision issues. The air mixer can easily be cleaned by using KimWipes and DI water.
That concludes the daily maintenance routine for the M324 system. Taking about 15 minutes to clean the attachment after each use helps in the short term for the next analyses and reduces the number of analytical issues that will arise in the long run.
Next, we’ll discuss cleaning procedures that are performed after roughly 20 analysis days.
Ladles are a part of the monthly maintenance but can be cleaned at any point. Discoloration of the ladles indicates that sodium carbonate and debris have accumulated inside the attachment, which will require cleaning of both the ladles and heater cartridge. Ladles can be cleaned by leaving them overnight in a solution of DI water, white vinegar, and hydrogen peroxide.
Ladles also become brittle over time due to frequent temperature fluctuations. When it becomes difficult to prepare a sample due to large chips, they may need to be replaced.
Our laboratory typically uses seven ladles during analysis and ideally keep an additional 3-4 new ladles on hand to use when they break unexpectedly.
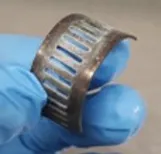
I can’t stress enough how important it is to keep up with Preventative Maintenance to avoid irreversible damage to your system. Accumulation of sodium carbonate inside the heater cartridge will cause analytical issues and make it more challenging to insert ladles. Forcing the ladle into the heater cartridge can damage the heating element and result in temperature issues or even a short circuit. As you can see in the picture on the right, the heating coil is protruding out, which means it can no longer be repaired.
Ideally, the heater cartridge should be cleaned roughly every 20 analysis days, or earlier if you notice difficulty calibrating or if the ladles are coming out discolored.
If you’re in a time-sensitive situation, keeping an extra heater cartridge on hand is helpful to quickly swap out when you don’t have the time to allow for the dirty heater cartridge to cool down, clean, and dry.
To clean the heater cartridge, take any container roughly 5” tall and fill it most of the way with water. Splash some vinegar and peroxide to create the cleaning solution for the heater cartridge – this solution can also be used to clean ladles.
Dunk the heater cartridge into the solution as many times as necessary until it drips clear. You may have to replace the solution if it turns dark. Make sure not to submerge the entire cartridge – it contains electrical components that will be damaged if wet. When setting the heater cartridge down, make sure that it’s set on its side to prevent moisture from running into the electrical components and causing a short circuit. When the heater cartridge runs clear – fill the container with only DI water to remove any residue from the vinegar and peroxide. Set it on its side to dry overnight.
The ceramic band is an essential part of the heater cartridge, and its purpose is to keep the thermocouple in place for accurate temperature readings. Improper cleaning procedures can damage the ceramic band and lead to inaccurate temperature readings and can potentially short out the heater cartridge.
When cleaning the heater cartridge, it’s crucial not to leave the cartridge inside the container full of solution – if left for more than a few minutes, this can cause the ceramic band to crack and fall off.
If the ceramic band starts to crack, it will need to be sent in for repair to ensure correct temperature readings and prevent further damage.
Another area particulate can also buildup is in the heater cartridge housing, and if it’s not cleaned periodically, it can wear down the protective coating on the attachment over time. This procedure can be done in parallel with the heater cartridge maintenance. While the heater cartridge is removed for cleaning, strategically wrap a paper towel around long tweezers so the metal is not exposed, which can scratch the attachment. Use DI water to wet the paper towel and gently wipe down the housing surface. Rewrap the paper towel if necessary and use the clean side to wipe until the paper towel comes out clean. Dry off using a new paper towel, perform a leak check, and replace the Viton o-ring before reattaching the heater cartridge.
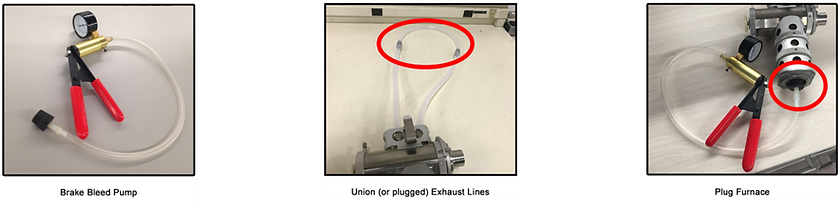
After cleaning the heater cartridge housing, we recommend performing a leak check to check the gaskets’ performance and ensure the system is airtight, especially around the optics where a leak is most commonly found. The leak check kit has everything you need to perform a proper leak check. After using a union to connect the exhaust hoses and seating the rubber cork tightly in the furnace entrance, induce a minimum of 15” of mercury and check if it holds a vacuum. If it leaks more than 0.5” of mercury per second, try re-seating the rubber cork or reevaluating the window collars to ensure they’re tightened a ¼ past hand tight. If you’re having difficulty maintaining as vacuum, try placing a graphite gasket on both sides of the windows.
Biannual maintenance is a reminder to periodically check particular components that do not accumulate with debris as quickly. Keeping up with daily and monthly maintenance also reduces the frequency of cleaning or replacing these components.
Similar to the ladles, the silicone exhaust hoses can also become discolored, brittle, and crack over time due to the constant high temperature.
The hoses should be checked periodically and changed roughly every six months to prevent build-up of particulate and moisture, which can lead to pluggage in the lines or even the filter assembly.
We recommend replacing the hoses inside a fume hood and placing them inside a sealed bag before disposal. It would also be an excellent time to replace the o-rings on the quick connects.
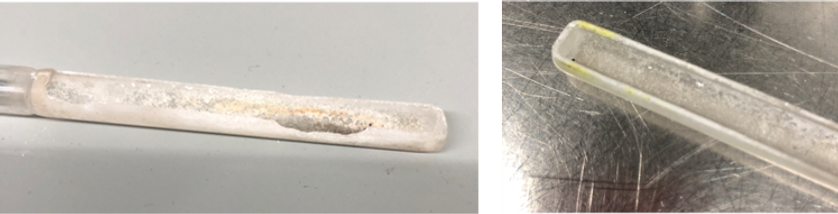
Before attaching new hoses, the exit ports should be cleaned.
Fine particulate can also accumulate in the exit ports, which can lead to imprecision. Although the exit ports are after the optical path, it’s still close enough to affect the mercury measurements when a lot of build-up is present.
To clean the exit ports, moisten a cotton swab with DI water and swab inside each exit port. The swab can be inserted into the exit port until you see it in the optical path. Continue wiping until the swab comes out clean and remove any moisture using a dry swab.
Lastly, the filter assembly should also be leak checked on a biannual basis. We want to ensure all the mercury vapors are caught in the filter assembly and that the reported flow through the pump station matches the flow through the furnace attachment. Flow is a critical factor in analysis because it is inversely proportional to the mercury peaks’ size and thus, the calculated measurements of the sorbent traps. Incorrect or inconsistent flow can lead to inaccurate or imprecise results.
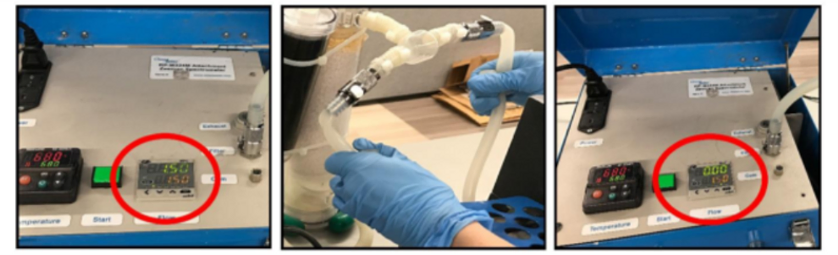
To conduct a leak check on the filter assembly, the flow should be set to 4.0LPM. Use your hands to double crimp the hoses on either side of the tee and ensure the flow rate reduces to 0.0LPM and watch the readout blink a few times. Slowly release the hoses to allow flow through the filter assembly – releasing the hoses too quickly may damage the pump station.
Ohio Lumex primarily performs annual maintenance, but I hope to provide a better idea of what happens behind the scenes to show the importance of how each service improves the quality of your results and extends the lifetime of your analyzer.
The filter assembly will become saturated over time with moisture and mercury. We recommend sending in the filter assembly once a year with the M324 annual service to get it reloaded and ensure it’s still working correctly. Waiting too long to get the filter assembly reloaded can lead to oversaturation of the filter contents, and the moisture and mercury can make its way into the pump station and potentially cause damage.
Calibration standards should also be changed on an annual basis. Over time, the solution can evaporate, leaving a more concentrated standard and can bias results low. Make sure to label the Hg standard with the date it was opened, and the date it will expire so outdated standards are not being used to calibrate and analyze sorbent traps. The sealed bag the calibration standard is packaged in also states the expiration conditions.
Similar to the furnace attachment, it’s also essential to keep up with preventative maintenance on the spectrometer. We recommend sending in the entire M324 system on an annual basis to verify the spectrometer is working correctly to provide accurate measurements.
The major components we check for are linearity of the spectrometer and lamp life to ensure it can last for another year. We also check the alignment of the optics and make any necessary adjustments to improve its performance. Additionally, we inspect and tune other components to prevent possible failures in the near future. A hard copy of all the services performed can be found with the M324 system after it’s returned to you.
The lamp, pmt sensor, and optical prism are the most common components that can affect the analyzer’s light intensity and the instrument response. The light intensity decreases over time, and the spectrometer will need tuning to maintain linearity across the full range of the instrument, which is why it’s recommended to keep up on the annual maintenance. After the spectrometer is serviced, internal calibration is performed. You can typically find a laminated copy of the certification in the case after the analyzer is returned to you.
During the annual maintenance, we also service the furnace attachment and examine the components to ensure everything is in good condition and working properly. We also deep clean the attachment and replace any consumables that have worn down since the last replacement. At a minimum, we perform a Certification of Operability after the entire system has been serviced and cleaned to ensure it is running well before sending it out. The report you receive includes the list of services performed on the attachment. The technician often leaves tips on how to perform maintenance based on the condition it arrived in.
If your system is used to analyze compliance or RATA traps, we recommend performing a new method certification after every service because there will be slight changes in instrument response. Flow rate primarily affects the calibration range, so your analyzer should be certified at a specific flow rate that yields your desired range. Your sorbent trap spike level should also fall within the certified range of the instrument.
The method certification consists of the bias test, MDL study, and spike recovery study.
The bias test is performed to ensure that spikes using liquid standards recover similarly to sorbent trap spikes.
The MDL study determines the lowest detectable response that is distinguishable from noise.
The spike recovery study ensures that spiked sorbent traps can fully recover from the lowest to the highest level within the calibrated range.
Lastly, we recommend verifying the pipette annually and can be done by sending in your pipette during the annual M324 service. Over time, pipettes can come out of calibration and cause imprecision. Having an accurate pipette is a fundamental part of the analysis since incorrect volumes of standards can lead to difficulty achieving a linear calibration or bias of your sorbent trap measurements.
It’s important to store the pipette so it stays safe and stationary – leaving the pipette in a drawer where it can roll around can potentially damage the pipette.
We recommend sending in the pipette with your M324 annual service to go through an extensive check to ensure the pipette volumes are within specifications or perform a linear offset if necessary.
If you have any additional questions about M324 routine maintenance or anything related to your monitoring needs, please contact us, and we’ll be happy to assist!