Thanks for tuning in. I’m Kelly, and I’m one of the Ohio Lumex instrumentation specialists. We’ll be covering common issues we see during sorbent trap analysis, why it happens, and how to combat them. Feel free to download the Guide to Troubleshooting and Preventative Maintenance to follow along!
Before we jump in, I wanted to touch on the importance of keeping up with routine maintenance and service for your instrument. Preventative maintenance goes a long way, especially to minimize troubleshooting efforts. Taking 15 minutes to clean the analyzer after use reduces excessive buildup of particulates, which could lead to imprecision, poor spike recoveries, calibration issues, and potential corrosion. Having good cleaning procedures will yield more accurate results and extend the lifetime of the furnace attachment. Hop on over to the Preventative Maintenance Webinar to check out the latest updates to our recommended maintenance regimen
Always take precautions when handling the furnace attachment, even when it’s detached and powered off. Please make sure the furnace attachment has cooled to ambient temperature before performing any maintenance – we recommend waiting roughly 30 minutes to an hour. Carefully use tools and cleaning solutions when cooled to maintain the protective coating on the attachment.
We can group all the common issues we see into four major categories: imprecision, peak abnormalities, baseline abnormalities, and calibration and spike recovery issues. We’ll go through the issues that fall within each category and discuss the most likely solutions for each, starting with imprecision. This section begins on page 4 of the Guide to Troubleshooting and Preventative Maintenance.
Imprecision is one of the most common issues we see. Irreproducible results, especially when measuring Continuing Calibration Verifications, are a tell-tale sign that the analyzer is imprecise.
If you suspect imprecision, run eight samples at the same level to calculate the average response, the standard deviation, and the relative standard deviation (or RSD). An RSD greater than 10% will confirm the instrument is imprecise, which is a sign to start troubleshooting.
As we continue, we’ll get into more details of each cause and go over the procedures on how to improve the precision of your analyzer.

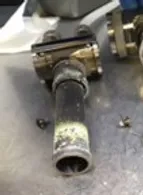
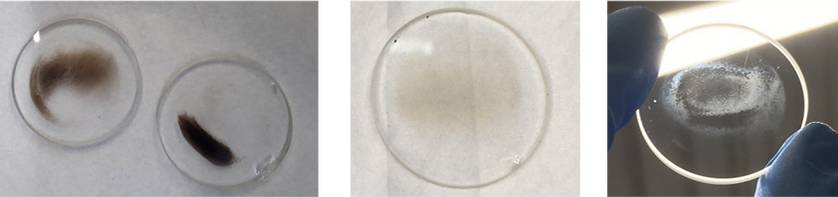
Sodium carbonate buildup is typically the biggest cause of imprecision. Quality sodium carbonate and good lab practices are crucial to reducing the accumulation of fine dust, which can lead to extreme corrosion, as seen in the photo to the right. We specifically picked sodium carbonate that contains a more uniform grain size and less fine dust, which helps preserve your attachment’s life. If you find that the furnace attachment fouls up quickly, it may be time to consider switching to different soda. When preparing a sample, make sure to compress the loose sodium carbonate in the ladle to prevent the soda from dispersing inside the attachment.
Daily cleaning is a good practice, but it cannot reach some places in the attachment resulting in buildup over time. When imprecision starts to occur, it’s time to perform additional cleaning procedures, such as cleaning the heater cartridge and housing, as well as the exit ports. If you’re in a time-sensitive situation, keeping an extra heater cartridge on hand is helpful to quickly swap out when you don’t have the time to allow for the dirty heater cartridge to cool down, clean, and dry. I’ll demonstrate in the next slide how to properly clean your heater cartridge.
Other good buildup indicators are when ladles come out of the attachment discolored or when it’s difficult to insert a ladle without much force.
To clean the heater cartridge, take any container roughly 5” tall and fill it up most of the way with water. Splash some vinegar and peroxide to create the cleaning solution for the heater cartridge – this solution can also be used for cleaning ladles.
Dunk the heater cartridge into the solution as many times as necessary until it drips clear. You may have to replace the solution if it gets dark like this one. Make sure not to submerge the entire cartridge – it contains electrical components that will be damaged if wet. When setting the heater cartridge down, make sure that it’s set on its side to prevent moisture from running into the electrical components and causing a short circuit. When the heater cartridge runs clear – fill the container with only DI water to remove any residue from the vinegar and peroxide. Set it on its side to dry overnight.
Over time, pipettes can come out of calibration and cause imprecision. An accurate pipette is a fundamental part of the analysis since incorrect volumes of standards can lead to difficulty in achieving a linear calibration or bias of your sorbent trap measurements.
It’s important to store the pipette so it stays safe and stationary – leaving the pipette in a drawer where it can roll around can potentially damage the pipette.
We recommend sending in the pipette with your M324 annual service to go through an extensive check to ensure the pipette volumes are within specifications or perform a linear offset if necessary.
If the pipette is accurate but is still challenging to create a linear calibration, the pipetting technique may need to be refined. Since the technique can be difficult to master, we created Dry Standards for those who don’t perform analysis frequently by minimizing the time spent creating a good calibration. The Dry Standards are all in one, meaning we cut out the need for carbon and pipetting, so the Dry Standard can be directly dispensed into a ladle and covered with soda. These are also super helpful for those who perform analysis in the field, as I do. I never have to worry about transporting liquid standards anymore because Dry Standards are not considered a hazardous material.
The filter assembly is a significant component of the M324 Sorbent Trap Analysis System. Over time, the filter assembly will become saturated with moisture and mercury. The moisture can also mix with the sodium carbonate that gets into the attachment and can cause pluggage in the lines and overwork the pump station to achieve the flow rate setpoint. Since flow rate is the determining factor for the mercury peak’s size or area, it’s best to keep a steady flow rate to maintain precision. A flow rate at 1LPM will yield a peak 4x larger than at 4LPM. If the flow rate fluctuates due to pluggage, the mercury passes through the optical cell at varying rates and can cause inconsistent size peaks for the same expected mass, otherwise known as imprecision.
We recommend replacing the contents of the filter on an annual basis to ensure it’s working properly and also to extend the lifetime of the pump station.
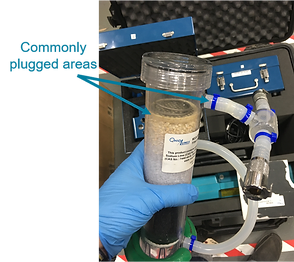
If you notice the flow rate fluctuating continuously, we first need to determine whether it’s the filter assembly or the pump station causing the fluctuations. If fluctuations still occur when the filter assembly is disconnected from the pump station, then reduce the flow rate setpoint on the mass flow controller by 1.0LPM and slowly increase back to the original flow rate. If that does not work, the pump station will need to be sent back to Ohio Lumex for further troubleshooting. If fluctuations only occur when the filter assembly is connected, the most common location for pluggage is at the intake or the filter pad shown on the photo. You can check for a clog by carefully removing the silicone tubing and glass tee from the intake. If the intake is clogged, work in a fume hood and use a thin and rigid object to carefully unclog the filter. If intake is not clogged, the filter assembly may need to be refurbished or replaced.
An intermittent leak in the system will also cause some imprecision due to the air leaking into the optical cell, likely biasing measurements low. The most common area for a leak to occur is at the window collars.
Ensuring the optical cell and threads are free of any particulates will help maintain the gaskets and windows from getting damaged when threading on the window collars.
A leak can also occur between the heater cartridge and the rest of the attachment. Utilizing a Viton o-ring will also help prevent leaking. This is updated from the old white insulation style gaskets, so make sure you have the right one.
If you do suspect a leak during analysis, you can analyze an audit trap at any time to confirm. It is beneficial to analyze an audit trap to ensure the instrument is running properly before analyzing compliance traps.
A leak check can also be performed to verify the attachment is airtight. An optimal time to perform a leak check is after cleaning the heater cartridge, while it is cool and separated from the attachment.
The audit trap is essentially an unsampled spiked trap used to verify the analyzer is working well. Although this is not a required step, audit traps are beneficial to spot underlying issues with the analyzer that cannot be seen when analyzing the independent calibration verification or continuing calibration verifications. Since an audit trap can prevent sorbent traps from being invalidated, we highly recommend using one to check before analyzing any compliance traps.
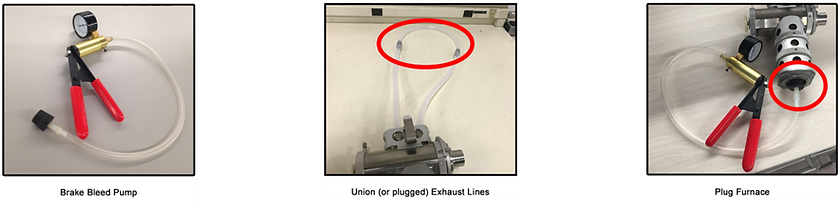
The M324 leak check kit includes a brake bleed pump with a vacuum gauge, making it easy to adjust the tightness of the window collars while verifying the vacuum.
Make sure the furnace attachment has cooled down to ambient temperature before performing a leak check.
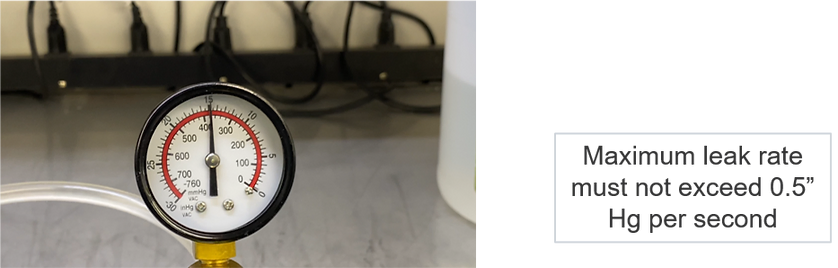
Use the quick connect union in the M324 leak check kit to isolate the cell chamber and plug the furnace’s opening using the hand pump. Once the rubber cork is snug, pump the brake bleeder to induce roughly 15-20” of Hg.
If the vacuum holds, no leak is present.
If the leak rate exceeds 0.5” Hg per second, first check for a leak at the attachment entrance by re-seating the cork.
The most common location for a leak is at the window collars – make sure the graphite gaskets and quartz windows are not cracked, crimped, or pushed up against any particulate, and the window collars are tightened ¼ turn past hand-tight.
If there is any difficulty maintaining a vacuum, graphite gaskets can be used on both sides of the window to create a better seal.
A leak can also occur at the silicone exhaust lines since they can harden over time and occasionally crack. These lines can be replaced at any time.
After the leak check, ensure the Viton o-ring is placed between the heater cartridge and attachment.
As we saw, the precision of the mercury measurements is largely dependent on the upkeep of the analyzer. Please check out page 3 of the Guide to Troubleshooting and Preventative Maintenance or the Monthly Maintenance section in the Preventative Maintenance Webinar for more details on cleaning the attachment containing excessive buildup.
Next, we’ll discuss baseline abnormalities commonly seen on the RAPID software. This section is located on page 7 of the Guide to Troubleshooting and Preventative Maintenance.
Baseline abnormalities are common during the initial stabilization period and are generally easy to identify by zooming into the baseline along the y-axis. We don’t recommend beginning analysis until the baseline has stabilized, which typically requires a minimum warmup time of two hours from turning on both the spectrometer and pump station.
We’ll discuss the potential causes of baseline abnormalities and when to decide it’s time to send in the instrument to Ohio Lumex.
The optics are a critical component of the instrument, and the quartz windows in the attachment are the most susceptible to getting dirty. Cleaning and inspecting the windows after every analysis day is a good practice to ensure the optical path is clear, yielding more accurate results.
A noisy baseline, defined by an SD of 3, reduces your analyzer’s sensitivity, which will make it difficult to quantify low-level mercury. A high SD is an indicator located at the top of the RAPID graph that the light path through the optical cell is obstructed, and most likely, the windows need to be cleaned or replaced.
If the SD is abnormally high, then the lamp may be unlit or getting old. If you cannot restart the lamp, please contact Ohio Lumex for service.
An SD close to 0.1 shows the internal settings may have been compromised and will need to be sent into Ohio Lumex for evaluation.
We recommend a minimum warmup time of 2 hours, but the baseline is the best indicator of instrument stabilization. Each instrument varies slightly, so longer stabilization time may be necessary if the baseline hasn’t settled out after a couple of hours. If possible, setting up the instrument to warm up overnight is optimal.
The M324 is very sensitive to temperature and humidity, so baseline drift can also occur if the instrument is near an air vent and AC kicks on or if the trailer door is left open for a few minutes. Ideally, the M324 should be set up in a humidity and temperature-controlled room to prevent it from drifting out of calibration, especially during analysis.
Sine waving can also occur during the initial warmup period and is an indicator that the windows are old if the baseline doesn’t settle out.
Generally, baseline abnormalities are uncommon after the instrument has stabilized. If baseline issues are still present after substantial warmup time, transport the instrument to another location with minimal temperature fluctuations or replace windows if sinewaving occurs.
Peak abnormalities are more common than baseline abnormalities during analysis. Flip to page 8 of the Guide to Troubleshooting and Preventative Maintenance to continue following along.
Some peak abnormalities present themselves with the first mercury peak, but others happen sporadically and are sometimes unavoidable.
Intermittent peak abnormalities can occur when the optical cell is oversaturated with mercury beyond the calibration range or when loading large amounts of data in the software, like the measurement database, while a peak is eluting.
It’s a good laboratory practice to view the entire peak after it elutes to confirm the peak was not compromised. Avoiding to use any program features during analysis will help prevent glitches as well.
No mercury readings or inverted peaks are typically indicators that the analyzer is not set to the correct parameters for use of the external attachment. These specific peak abnormalities are usually caught when initially trying to calibrate.
Ensure the “Optical Bridge” position on the back of the spectrometer is set to “Position I,” and the “Operating Cell” mode on the RAPID software is set to “External Path” prior to starting the graph.
If inverted peaks are observed only while analyzing sorbent traps, this may be a sign there is an interference. Stop analysis and call Ohio Lumex for further troubleshooting.
When the optical cell is over-saturated with mercury, it usually results in a double peak and an inaccurate reading outside of the calibrated range. This may be coupled with a delta D error warning box as well. If this was a sorbent trap section, run a continuing calibration verification to ensure the analyzer is still running well, and there is no residual mercury inside the furnace attachment that could affect subsequent results. Homogenize and split the remaining carbon sections to ensure they’re within your calibration range.
If a double peak is present but is within your calibrated range, this could indicate a pipetting error or potential interferent. Run a continuing calibration verification and ensure the peak is nice and gaussian before continuing analysis.
Software glitches can occur on rare occasions. The resulting peaks typically contain sharp lines, such as plateaus and single-point errors.
To avoid glitches, it’s recommended to avoid using program features, like switching back into calibration mode or loading the measurement database during analysis. It’s good laboratory practice to view the entire peak to ensure the most accuracy.
If you do spot a glitch, discontinue analysis right away, save the graph, restart the spectrometer, and reopen the software.
To reduce the frequency of peak abnormalities, make sure the analyzer is set to the correct parameters prior to starting analysis and avoid using program features during analysis.
Calibration and Spike Recovery issues are also a common and important topic because it can heavily impact sorbent trap results. This section can be found on page 9 on the Guide to Troubleshooting and Preventative Maintenance.
A bad calibration will yield bad results, so calibration and spike recovery issues can sometimes go hand in hand.
Having difficulty generating a linear calibration over your normal range or often failing spike recoveries is a sign the analyzer may need maintenance performed. We’ll delve into the root of the issues and discuss options to make calibration less difficult and yield better spike recoveries.
If it becomes more difficult to pass your calibration according to the Method 30B QA/QC, it may be due for additional cleaning of the furnace attachment and housing. Check out pages 2 and 3 of the Guide to Troubleshooting and Preventative Maintenance or the M324 Maintenance Webinar for our recommended cleaning regimen.
If the analyzer was just thoroughly cleaned and is still difficult to calibrate, the lamp intensity may be low and require a tune-up to improve the linearity. Contact Ohio Lumex for additional support if you suspect an issue with the optics.
It may initially be difficult to discern whether a failed spike recovery is due to analytical or sampling issues. It’s important to ensure your calibration, ICV, CCV, and audit spikes are all passing right before analyzing any traps to rule out analyzer issues. Notify the sampling technician if you observe anything visually unusual on the traps. Contact Ohio Lumex for troubleshooting the analysis or sampling side.
Lastly, failed spike recoveries can result from a calibration that has drifted or a leak in the system that leads to a spike bias. The most common reason for failing spikes is due to spike bias. Spike bias is the difference between oxidized mercury (or liquid mercury used to calibrate) and elemental mercury (or vapor phase mercury used to spike sorbent traps). This often flies under the radar because CCVs using liquid standards can still pass within the allotted 10%. The best laboratory practice is to analyze an audit spike or burn an unused spiked trap before running any samples to ensure the sorbent trap results are accurate. If a spike bias is present, the attachment will need deep cleaning, and performing a leak check will help locate the leak.
Make sure to check the calibration often by running a continuing calibration verification.
If the CCV does not pass, the analyzer has likely drifted out of calibration and will need recalibration.
A bias can also occur from using expired standards or using a pipette that is out of calibration. It’s good laboratory practice to note each standard’s expiration date to ensure the standards used are still valid. An audit spike will always be helpful to verify your calibration independently. We also recommend verifying your pipette on an annual basis to make sure pipette volumes are accurate.
I can personally vouch for the Dry Standards, so you don’t have to worry about the pipette, liquid standards, or carbon. They’re easy to use, especially when analyzing sorbent traps on-site, and I have always been able to obtain an excellent calibration.
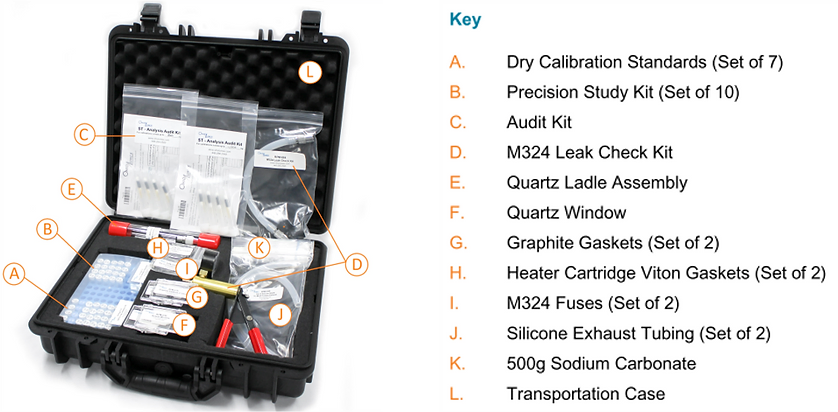
At Ohio Lumex, we know how involved troubleshooting can be, especially when on-site with limited access to resources. We created this troubleshooting kit with almost everything you need to diagnose and solve the issues discussed.
Thanks for following along! Please feel free to contact me directly to send an update with your troubleshooting results or if you need any additional assistance! Check out the M324 Routine Maintenance Webinar to learn our updated techniques to improve the quality of your sorbent trap results as well as extending the lifetime of the analyzer.